How to make your own Youtube video widget in WordPress
There are hundreds of tutorials out there which tell you how to make your own Widgets in WordPress, however I think that most of them are missing one thing or another. This tutorial aims to cover everything you need to know, plus you will end up with a useful widget that outputs any Youtube video in any size and with any title.
Firstly you will need to create a new empty PHP file, lets call it youtube-widget.php, and put it in the plugin directory of your WordPress install (wp-content/plugins/). Putting it here means it can be used in any theme.
Now lets start adding some code to youtube-widget.php. The first thing you need to do is add some meta information and then define the class name.
[php]
/*
Plugin Name: Youtube Widget
Description: Youtube Widget outputs a youtube video into your sidebar
Author: Zak Grindle
Version: 1
*/
class YoutubeWidget extends WP_Widget
{
}
[/php]
It’s good practice to name your class the same as the file name and you also need to make sure your class extends the WP_Widget class.
There are four key methods to add when creating a widget, the code within these will handle everything from set up, display, updating and backend control.
Set Up
First you need to add a method to set up your Widget, this needs to have the same name as your class, and create your widget using the WP_Widget function.
[php]
function YoutubeWidget()
{
//this array just gives your Widget a title and quick description
$widget_ops = array(‘classname’ => ‘YoutubeWidget’, ‘description’ => ‘Displays a youtube video based on given id’ );
//create your widget in WordPress
$this->WP_Widget(‘YoutubeWidget’, ‘Youtube Video’, $widget_ops);
}
[/php]
Display
The next method will take the Widget settings and display the widget based on those values. Anything that is output in this method will be displayed as the widget. You must include the $before_widget and $after_widget to ensure that the theme is still in control of how the widget is displayed (these are basically wrappers that are defined in the theme).
In the case of the Youtube widget there will be 4 settings to output: title, youtube video id, height and width, as well as the Youtube embed code.
[php
function widget($args, $instance)
{
extract($args, EXTR_SKIP);
//wrapper defined in your theme
echo $before_widget;
//get the title from the saved settings
$title = empty($instance[‘title’]) ? ‘ ‘ : apply_filters(‘widget_title’, $instance[‘title’]);
//if there is a title, output it
if (!empty($title))
echo $before_title . $title . $after_title;;
//get the video id from the save settings
$video_id = empty($instance[‘video_id’]) ? ‘ ‘ : apply_filters(‘widget_title’, $instance[‘video_id’]);
//if there is a video id, output the youtube embed code with our video id, width and height settings used
if (!empty($video_id))
echo ‘‘;
//close the wrapper defined in your theme
echo $after_widget;
}
[/php]
Updating and Saving
The display method above uses the 4 user defined settings to control the widget content. You need to make sure that whatever settings the user enters in the back end are saved and used in the front end, the update function fulfils this purpose.
[php]
function update($new_instance, $old_instance)
{
//update the old values with the new ones
$instance = $old_instance;
$instance[‘title’] = $new_instance[‘title’];
$instance[‘video_id’] = $new_instance[‘video_id’];
$instance[‘video_height’] = $new_instance[‘video_height’];
$instance[‘video_width’] = $new_instance[‘video_width’];
return $instance;
}
[/php]
Widget Control
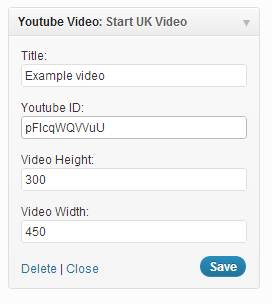
So far the widget displays and updates based on user defined settings, however there is currently no way for the user to enter these settings. This is where the form method comes in. This method (as the name suggests) contains the form that admin users see and update in the WordPress backend, the values from this form are then saved (using the update method) and displayed (using the display method).
The Youtube widget uses 4 different settings in the widget display, so you need to define an input option for each one of these. The input type can be any standard html form element, however for this example only text inputs are used.
[php]
function form($instance)
{
//set some default values for each setting
$instance = wp_parse_args( (array) $instance, array( ‘title’ => ”, ‘video_id’ => ”, ‘video_hieght’ => ”, ‘video_width’ => ” ) );
$title = $instance[‘title’];
$video_id = $instance[‘video_id’];
$video_height = $instance[‘video_height’];
$video_width = $instance[‘video_width’];
//create an input for each setting
?>
}
[/php]
Hooking the Widget into a theme
All of the widget functionality has now been covered, all that is left to do is make sure the Widget appears in your theme. Firstly you need to add some code to the end of the youtube-widget,php file which will load the widget
[php]
add_action( ‘widgets_init’, ‘youtube_widget’ );
function youtube_widget() {
register_widget( ‘YoutubeWidget’ );
}
[/php]
Finally open up the functions.php file of your chosen theme and include the following statement
[php]
//you need to define the WP_PLUGIN_DIR constant
require( WP_PLUGIN_DIR . ‘/bed-youtube-widget.php’);
[/php]
This loads the code within youtube-widget.php and your widget should now be available.
That’s it, easy!
Magento
eCommerce
Magento is the leading solution for eCommerce, and we’re specialists. Magento is easy-to-use, completely customisable and endlessly scalable.

Bespoke
Builds
We offer custom web development services for any requirement. Manufacturing from scratch, we deliver a project entirely tailored to your needs.

Working with brands nationally from our offices in Cardiff and Exeter, our tenacious team of designers and developers deliver sophisticated results every time.


